

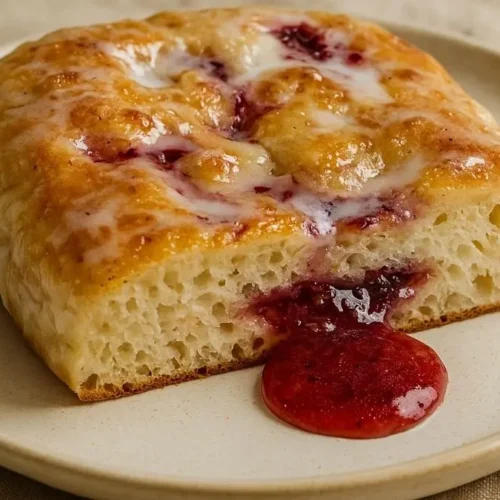
Imagine combining the pillowy softness of classic focaccia with the sweet, jammy goodness of a jelly doughnut. This jelly doughnut focaccia recipe transforms traditional Italian bread into an indulgent dessert that’s perfect for sharing. The high-hydration sourdough creates an incredibly tender crumb, while ghee replaces olive oil for that signature buttery flavor.
This unique twist on focaccia starts with active sourdough starter and fresh seasonal fruit. The homemade jam filling, made with a mix of berries and peaches, gets piped directly into the baked bread for maximum flavor impact. It’s like having a giant glazed doughnut that feeds a crowd.
Whether you’re looking to impress guests at brunch or want to try something completely different with your sourdough starter, this jelly doughnut focaccia recipe delivers bakery-quality results at home.
What Does Jelly Doughnut Focaccia Recipe Taste Like?
This jelly doughnut focaccia offers the perfect balance of sweet and savory flavors. The sourdough base provides a subtle tang that complements the rich, buttery notes from the ghee. Each bite delivers the familiar comfort of fresh-baked bread with an unexpected burst of fruity sweetness from the homemade jam.

The texture is absolutely divine – crisp and golden on the outside with a tender, chewy interior that’s characteristic of great focaccia. The ghee creates that authentic buttery flavor you’d expect from a classic jelly doughnut, while the flaky salt on top adds just the right amount of contrast to the sweetness.
The homemade berry and peach jam brings bright, fresh fruit flavors that aren’t overly sweet. The citric acid helps the fruit set up properly while maintaining that perfect pipeable consistency. When finished with the vanilla glaze, it tastes like a cross between artisan bread and your favorite bakery doughnut.
Ingredients Required for Jelly Doughnut Focaccia Recipe
Here’s the list of Ingredients you’ll need to make this Jelly Doughnut Focaccia
- 440g filtered water
- 120g ripe sourdough starter
- 625g bread flour
- 11g salt
- 3-4 tablespoons ghee
- Flaky salt for topping
- 500g mixed berries (blackberries, blueberries, strawberries)
- 500g fresh peaches, pitted and peeled
- 350g sugar
- 2 teaspoons citric acid
- 1 cup confectioner’s sugar
- 1 teaspoon vanilla extract
- 2-3 tablespoons milk
Kitchen Utensil You’ll Need
- Large mixing bowl
- Kitchen scale and Serrated peeler
- Heavy-bottomed saucepan
- Wooden spoon
- 9×13 inch baking pan
- Plastic wrap
- Piping bag or gallon zip-lock bag
- Thick drinking straw
- Paring knife
- Wire cooling rack
Prep Time: 45 minutes
Rising Time: 12-18 hours (overnight bulk fermentation + 2-3 hours final proof)
Cooking Time: 25 minutes for focaccia + 20 minutes for jam
Total Time: 14-20 hours (mostly hands-off time)
How to Make Jelly Doughnut Focaccia
Simply follow the steps given below to make your Jelly Doughnut Focaccia Recipe at home
1. Make the Jam: Pit and peel peaches using a knife and serrated peeler. Combine 1,000g mixed fruit (peaches and berries) with 350g sugar and 2 teaspoons citric acid in a saucepan. Cook over medium heat for 15-20 minutes until thickened. Test with frozen plate method – jam should hold a line when drawn through. Cool and refrigerate overnight.
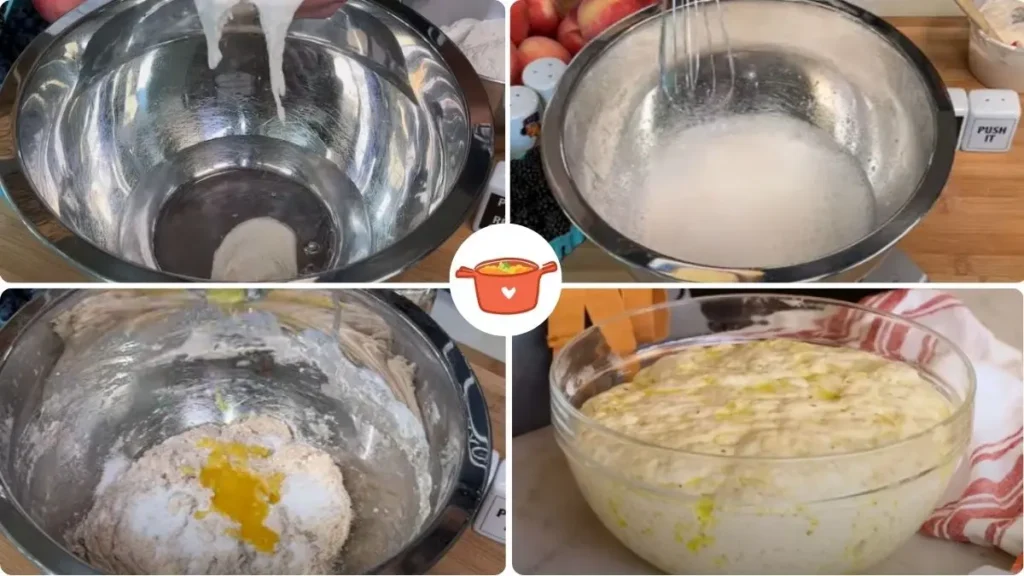
2. Prepare Dough: Dissolve 120g sourdough starter in 440g filtered water. Add 625g bread flour, mix and let hydrate 30 minutes. Add 11g salt and mix with wet hands.
3. Develop Gluten: Perform slap and fold technique 8-10 times. Rest 30 minutes, repeat slapping and folding. Cover tightly and refrigerate overnight for bulk fermentation.
4. Shape and Proof: Grease 9×13 pan with ghee. Transfer dough with ghee-coated hands, spread gently. Cover with plastic, proof 2-3 hours until doubled.
5. Bake Focaccia: Preheat oven to 400°F. Brush with ghee, sprinkle flaky salt. Create dimples using three fingers only. Bake 25 minutes until golden. Cool completely.
6. Fill with Jam: Cut holes throughout focaccia using paring knife. Fill piping bag with cooled jam and pipe into every hole systematically.
7. Make Glaze: Whisk confectioner’s sugar, vanilla, and milk until smooth.
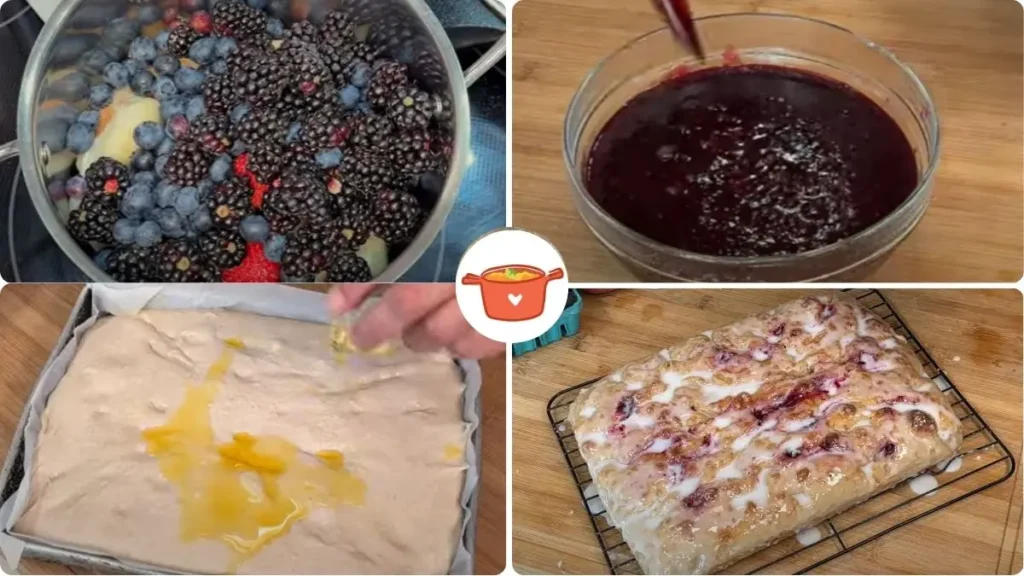
8. Finish: Spread glaze evenly over entire surface like a glazed doughnut. Serve immediately.
Some Tasty Ways To Customize and Serve This Jelly Doughnut Focaccia
From our experience making this recipe countless times, here are our favorite ways to serve this crowd-pleasing treat:
1. Weekend Brunch Centerpiece
We love cutting this into generous squares and serving it alongside scrambled eggs and crispy bacon. The sweet-savory combination is absolutely magical.
2. With Fresh Whipped Cream
A dollop of lightly sweetened whipped cream takes this over the top. We’ve found vanilla or cinnamon-spiced cream works best.
3. Warm with Vanilla Ice Cream
Serve slightly warmed slices with a scoop of premium vanilla ice cream. The temperature contrast is incredible.
4. Coffee Shop Style
Pair with strong espresso or cappuccino for an authentic café experience. The bread’s sweetness balances perfectly with bitter coffee.
5. Afternoon Tea Treat
Cut into smaller triangles for elegant tea service. We’ve served this at garden parties with rave reviews.
6. With Greek Yogurt
The tangy yogurt cuts through the richness beautifully. Try it with honey drizzled on top.
7. Toasted Next Day
Lightly toast leftover slices and spread with butter. It transforms into something completely new and delicious.
8. Wine Pairing
We’ve discovered this pairs surprisingly well with moscato or late-harvest riesling for dessert wine lovers.
9. Fresh Berry Garnish
Top with the same berries used in the jam for a beautiful presentation that doubles down on flavor.
10. Breakfast French Toast
Thick slices make incredible French toast. The jam inside caramelizes beautifully when pan-fried.
Some Tips on This Jelly Doughnut Focaccia Recipe
1. Keep your hands wet when you work with the dough.
Wet hands stop the dough from sticking to you. It makes everything so much easier!
2. Don’t rush the jam.
Cook it slow and stir it a lot. You want it thick like jelly, not runny like juice. Test it on a cold plate first.
3. Use good ghee.
Ghee tastes like butter but works better than butter. It makes your bread taste amazing and golden brown.
4. Let the dough rest overnight.
I know it’s hard to wait, but the bread tastes much better when you give it time to grow.
5. Make holes everywhere.
Don’t be shy! Poke holes all over your bread so you can fill it with lots of yummy jam.
6. Use only three fingers to make dimples.
No thumbs! This keeps the holes just the right size for baking.
7. Cool the bread first.
Hot bread will make your jam runny. Wait until it cools down before you add the jam.
8. Don’t skip the salt on top.
Flaky salt makes sweet things taste even better. Trust me on this one!
9. Make extra jam.
You’ll want to eat it on other things too. It’s that good! Put it on toast or ice cream.
10. Share with friends.
This bread is big! It feeds lots of people and makes everyone happy. That’s the best part.
How to Store and Reheat Jelly Doughnut Focaccia
Store leftover jelly doughnut focaccia covered at room temperature for up to 2 days. For longer storage, wrap tightly and freeze for up to 1 month. To reheat, warm individual portions in a 300°F oven for 5-7 minutes to restore the crispy exterior while keeping the interior soft and jammy.
Jelly Doughnut Focaccia Recipe
Ingredients
- 440 g filtered water
- 120 g ripe sourdough starter
- 625 g bread flour
- 11 g salt
- 3-4 tablespoons ghee
- Flaky salt for topping
- 500 g mixed berries blackberries, blueberries, strawberries
- 500 g fresh peaches pitted and peeled
- 350 g sugar
- 2 teaspoons citric acid
- 1 cup confectioner’s sugar
- 1 teaspoon vanilla extract
- 2-3 tablespoons milk
Instructions
- Make the Jam: Pit and peel peaches using a knife and serrated peeler. Combine 1,000g mixed fruit (peaches and berries) with 350g sugar and 2 teaspoons citric acid in a saucepan. Cook over medium heat for 15-20 minutes until thickened. Test with frozen plate method – jam should hold a line when drawn through. Cool and refrigerate overnight.
- Prepare Dough: Dissolve 120g sourdough starter in 440g filtered water. Add 625g bread flour, mix and let hydrate 30 minutes. Add 11g salt and mix with wet hands.
- Develop Gluten: Perform slap and fold technique 8-10 times. Rest 30 minutes, repeat slapping and folding. Cover tightly and refrigerate overnight for bulk fermentation.
- Shape and Proof: Grease 9×13 pan with ghee. Transfer dough with ghee-coated hands, spread gently. Cover with plastic, proof 2-3 hours until doubled.
- Bake Focaccia: Preheat oven to 400°F. Brush with ghee, sprinkle flaky salt. Create dimples using three fingers only. Bake 25 minutes until golden. Cool completely.
- Fill with Jam: Cut holes throughout focaccia using paring knife. Fill piping bag with cooled jam and pipe into every hole systematically.
- Make Glaze: Whisk confectioner’s sugar, vanilla, and milk until smooth.
- Finish: Spread glaze evenly over entire surface like a glazed doughnut. Serve immediately.
Video
Notes
Common Queries on This Jelly Doughnut Focaccia Recipe
Here, we’ve got you covered with some common questions about the Jelly Doughnut Focaccia Recipe that people often ask.
1. Can I use regular butter instead of ghee in this jelly doughnut focaccia recipe?
While you can substitute butter, we strongly recommend sticking with ghee from our experience. Regular butter contains milk solids and water that can make the focaccia soggy and affect the texture. Ghee gives that pure, rich buttery flavor without compromising the bread’s structure. We’ve tested both, and ghee consistently delivers better results.
2. What if I don’t have a sourdough starter?
You can substitute the sourdough starter with 2 teaspoons of active dry yeast mixed with the water, but honestly, the overnight sourdough fermentation is what makes this recipe special. If you’re serious about baking, we recommend getting a starter – it’s worth the investment for the complex flavors it develops.
3. My jam turned out too thick/thin. How do I fix it?
We use the frozen plate test every time – keep a plate in the freezer and test your jam by dropping a small amount on it. If it wrinkles when you push it with your finger, it’s perfect. Too thick? Add a tablespoon of water and cook briefly. Too thin? Cook it down a bit more. The key is achieving a pipeable consistency that’s not too smooth.
4. Can I make this recipe without the overnight rise?
Technically yes, but we don’t recommend it based on our testing. The overnight fermentation is crucial for developing those complex sourdough flavors and the proper texture. A same-day version just won’t have that depth of flavor that makes this focaccia so special.
5. What’s the best way to create those focaccia dimples?
This was a game-changer for us – use only three fingers, never your thumbs! Your thumbs are too wide and create uneven holes. We learned this through trial and error, and using just three fingers gives you those perfect, characteristic focaccia dimples every time.
6. Can I use frozen fruit for the jam?
Absolutely! We’ve made this with frozen berries many times, especially when fresh ones aren’t in season. Just don’t thaw them first – add them frozen directly to the pan. You might need to cook the jam a few minutes longer, but the results are just as delicious.
7. How do I know when the focaccia is properly proofed?
From our experience, the dough should fill the entire pan and feel light and airy when you gently press it. It typically takes 2-3 hours at room temperature, but this can vary based on your kitchen’s temperature. Don’t rush this step – proper proofing is essential for that perfect texture.
8. Can I make the jam ahead of time?
Yes! We actually prefer making the jam 1-2 days ahead. It allows the flavors to meld beautifully and makes assembly day much easier. Store it covered in the refrigerator and bring it to room temperature before piping into the focaccia.
9. What if I don’t have a piping bag for the jam?
We use a gallon zip-lock bag with the corner cut off – it works perfectly! Just make sure to cut the opening large enough for the jam to flow through easily. The thick straw method for creating holes is crucial though – don’t skip that step.
10. How long will this jelly doughnut focaccia stay fresh?
In our experience, it’s best within the first 2 days at room temperature, covered loosely with a kitchen towel. The glaze may soften slightly, but the flavors actually improve overnight. We don’t recommend refrigerating it as it changes the bread’s texture. For longer storage, freeze individual portions wrapped tightly.
This jelly doughnut focaccia recipe proves that the best innovations happen when you combine beloved classics in unexpected ways. The result is a show-stopping bread that delivers all the nostalgic flavors of a jelly doughnut in a format perfect for sharing. Don’t skip making your own jam – it’s what elevates this recipe from good to absolutely extraordinary. Ready to surprise your family and friends? Grab your sourdough starter and let’s get baking!
Feel free to share your experience with this recipe by trying it out. Don’t forget to drop a comment and provide your feedback on the blog for us to read.
Additionally, You can also like and, follow us on Pinterest, and YouTube for more updates. Your thoughts and engagement are greatly appreciated!
2 thoughts on “Jelly Doughnut Focaccia Recipe”