
Have you ever wanted to make your own ice cream cones at home? Well, guess what? This Baskin Robbins Waffle Cone Recipe is super fun and really easy. You can make cones that are just like the ones from the store!
They come out crispy, sweet, and oh-so yummy. You can fill them with any ice cream you like. And the best part? You get to eat the cone too-every last crunchy bite!
So, if you’re ready to make a tasty treat that feels kinda fancy but is super simple, this Baskin Robbins Waffle Cone Recipe is just the thing. Let’s make it together and have some fun!
What Does Baskin Robbins Waffle Cone Taste Like?
Oh wow, have you ever tried a Baskin Robbins waffle cone? It’s so, so good! It tastes sweet, warm, and just a little toasty. Like a soft cookie that got a little crunchy. Mmm, yummy!
When you bite into it, it crunches just right. Not too hard, not too soft. It’s like a little hug for your ice cream. And it smells sweet, like sugar and vanilla. So fun to eat! Also can pair with Baskin Robbins Cotton Candy Ice Cream.
It also has that little bit of magic. You know, the part where the cone catches the melty ice cream at the bottom? It’s the best part! If you love sweet things and ice cream, this cone makes it even better. You’ll want to eat it all the way to the tip!
Ingredients Required for Baskin Robbins Waffle Cone Recipe
Here’s the list of Ingredients you’ll need to make this Baskin Robbins Waffle Cone
- 2 tbsp melted butter
- 1 cup almond flour
- 2 tbsp brown sugar substitute (Lakanto Golden preferred)
- 2 tbsp granular sweetener (Swerve or Lakanto Classic)
- 1 tbsp egg white powder
- 1/4 tsp gum arabic
- 2 large eggs
- 2 tbsp water
- 1 tsp vanilla extract
(Optional): Roasted white or black sesame seeds for flavor variation
Kitchen Utensil You’ll Need
- Waffle cone maker (with bowl press and cone shaper)
- Mixing bowls
- Whisk
- Fine mesh strainer (metal preferred)
- Measuring spoons/cups (1/8 cup essential)
- Spatula
- Wire rack for cooling
Preparation Time: 10 minutes
Cooking Time: 2 minutes 10 seconds per cone
Yields: 8 waffle cones or bowls
Difficulty: Easy to moderate
How to Make Baskin Robbins Waffle Cone
Simply follow the steps given below to make your Baskin Robbins Waffle Cone at home
1. Mix the Batter
In a small bowl, melt butter in the microwave (25 seconds). In a separate mixing bowl, combine almond flour, brown sugar substitute, granular sweetener, egg white powder, and gum arabic.
Add melted butter, water, eggs, and vanilla extract. Optional: stir in sesame seeds for a nutty twist.
2. Strain & Rest
Pass the batter through a fine mesh strainer using a spatula. If the batter is too coarse, use a metal strainer. Discard any leftover clumps (about 1 tbsp worth). Let the batter sit at room temperature for 10 minutes.

3. Preheat & Pour
Preheat your waffle cone maker. Once ready, pour about 1/8 cup of batter onto the center and close the lid. Press firmly for 10 seconds to ensure even spreading.
4. Cook to Perfection
Cook for 1 minute, then flip and rotate for another 1 minute. The total cooking time is 2 minutes and 10 seconds. You’ll know it’s done when golden brown and aromatic.
Note: Waffles made with Lakanto sweetener retain their size better and offer superior crispness compared to Swerve brown sugar.
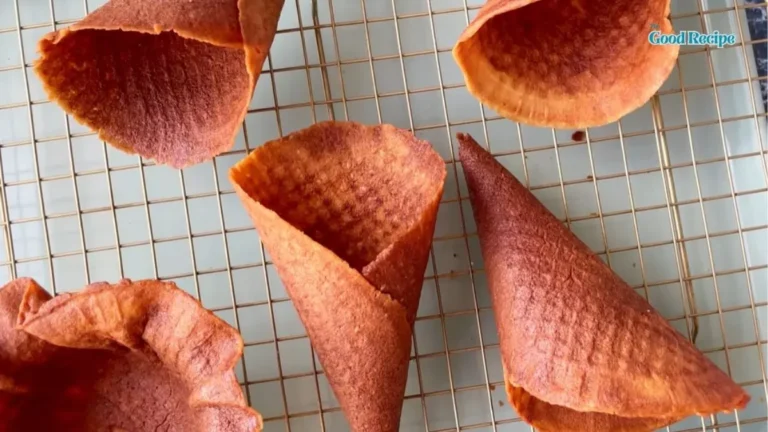
5. Shape and Cool
Immediately remove the waffle and wrap it around the roller shaper or press it into the bowl shaper. Cool on a wire rack until hardened.

Repeat for remaining batter.
Some Tasty Ways To Customize and Serve This Baskin Robbins Waffle Cone
1. Dip the rim in chocolate.
Oh my gosh, this is a must-try. We melted some sugar-free chocolate and dipped the top of the cone in it-then added sprinkles! It hardens so nicely and adds that little snap when you bite in.
2. Add crushed nuts.
We rolled the chocolate-dipped rim in crushed almonds and pistachios. So good. It gives a salty crunch that’s perfect with vanilla ice cream.
3. Mix in sesame seeds.
One time, we added roasted white sesame seeds to the batter before cooking-it gave such a nice nutty flavor. Black sesame works too and looks super cool.
4. Fill with whipped cream and berries.
No ice cream? No problem. We filled ours with sugar-free whipped cream, strawberries, and blueberries. Like a mini dessert parfait in a cone!
5. Use as a breakfast cone.
Yup-we actually stuffed it with Greek yogurt, granola, and honey. Breakfast meets dessert. Total game-changer.
6. Add cinnamon to the batter.
We tried a batch with a pinch of cinnamon mixed into the batter. It made the whole kitchen smell like a cinnamon roll!
7. Turn it into a sundae bowl.
Instead of rolling the cone, we pressed it into the bowl mold and filled it with three scoops of ice cream, nuts, chocolate drizzle… basically went all in. No regrets.
8. Fill with mousse or pudding.
For a party, we made keto chocolate mousse and piped it into mini cones. People devoured them. They’re so cute and perfect for little bites!
9. Add flavored extracts.
We swapped the vanilla extract for almond or even coconut extract. It gives the cones a little twist without changing the texture.
10. Coat the inside with chocolate.
One of our faves: we brushed the inside of the cone with melted chocolate so it stays extra crisp even when filled with melty ice cream. It’s a small thing-but it makes a big difference!
Waffle Bowl Variation
Craving a bowl instead of a cone? No problem!
- While the waffle is still hot, place it inside the bowl press and press down.
- Alternatively, place a bowl upside-down, lay the waffle over it, and press gently with a second bowl.
- Let cool and harden before removing.
Some Tips on This Baskin Robbins Waffle Cone Recipe
1. Use the right sweetener.
Don’t switch it! Lakanto Golden works best. We tried others and the cones didn’t turn out as crispy.
2. Let the batter rest.
Wait about 10 minutes before cooking. This makes the cones smoother and easier to shape.
3. Strain the batter.
Use a metal strainer. It helps take out any lumps. We skipped it once-oops, that cone was bumpy!
4. Measure the batter.
Use 1/8 cup for each cone. That’s the magic amount for size and crispiness.
5. Press the lid!
Hold the waffle maker lid down for 10 seconds. This helps the batter spread nice and even.
6. Watch the time.
Set a timer for 2 minutes and 10 seconds. One side, then flip! It really does make a big difference.
7. Shape fast!
When the waffle comes out, shape it right away. It cools super fast and can break if it’s too cold.
8. Let them cool.
Place them on a wire rack. It helps them get crunchy and not soggy.
9. Keep them dry.
Store the cones in a dry, closed container. Moisture makes them soft.
10. Have fun!
Try different add-ins like sesame seeds or cinnamon. It’s okay to play and make it your own!
How to Store and Reheat Baskin Robbins Waffle Cone
Storage Tips:
- Let cones cool completely. Store in an airtight container at room temperature.
- Keep away from humidity to preserve crispness.
- They stay fresh for up to 5 days.
Reheating (to refresh crispness):
- Preheat oven to 250°F (120°C).
- Place cones directly on the rack or a baking sheet for 3–5 minutes.
- Let cool before serving to regain that signature crunch.

Baskin Robbins Waffle Cone Recipe
Have you ever wanted to make your own ice cream cones at home? Well, guess what? This Baskin Robbins Waffle Cone Recipe is super fun and really easy. You can make cones that are just like the ones from the store!
Ingredients
- 2 tbsp melted butter
- 1 cup almond flour
- 2 tbsp brown sugar substitute (Lakanto Golden preferred)
- 2 tbsp granular sweetener (Swerve or Lakanto Classic)
- 1 tbsp egg white powder
- 1/4 tsp gum arabic
- 2 large eggs
- 2 tbsp water
- 1 tsp vanilla extract
- (Optional): Roasted white or
Instructions
1. Mix the Batter
In a small bowl, melt butter in the microwave (25 seconds). In a separate mixing bowl, combine almond flour, brown sugar substitute, granular sweetener, egg white powder, and gum arabic.
Add melted butter, water, eggs, and vanilla extract. Optional: stir in sesame seeds for a nutty twist.
2. Strain & Rest
Pass the batter through a fine mesh strainer using a spatula. If the batter is too coarse, use a metal strainer. Discard any leftover clumps (about 1 tbsp worth). Let the batter sit at room temperature for 10 minutes.
3. Preheat & Pour
Preheat your waffle cone maker. Once ready, pour about 1/8 cup of batter onto the center and close the lid. Press firmly for 10 seconds to ensure even spreading.
4. Cook to Perfection
Cook for 1 minute, then flip and rotate for another 1 minute. The total cooking time is 2 minutes and 10 seconds. You’ll know it’s done when golden brown and aromatic.
5. Shape and Cool
Immediately remove the waffle and wrap it around the roller shaper or press it into the bowl shaper. Cool on a wire rack until hardened.
Repeat for remaining batter.
Notes
Storage Tips:
Let cones cool completely. Store in an airtight container at room temperature.
Keep away from humidity to preserve crispness.
They stay fresh for up to 5 days.
Nutrition Information:
Yield: 8 Serving Size: 8Amount Per Serving: Calories: 120
Common Queries on This Baskin Robbins Waffle Cone Recipe
Here, we’ve got you covered with some common questions about the Baskin Robbins Waffle Cone that people often ask.
1. What are the ingredients in Baskin Robbins waffle cones?
Well, the original Baskin Robbins cones aren’t keto, but when we made them at home, we used almond flour, egg whites, butter, brown sugar substitute (like Lakanto Golden), and vanilla. That combo gave us the same sweet, toasty crunch we love.
2. How do they make waffle cones?
It’s pretty cool and simple! You mix the batter, pour it into a hot waffle cone maker, press it, cook it for about 2 minutes, then quickly roll it while it’s still warm. That’s it! It gets crunchy as it cools.
3. Why do waffle cones taste so good?
We think it’s the combo of sweet, buttery, and a little bit toasty. Plus, the smell when it’s cooking? Wow. It’s like walking into an ice cream shop at home.
4. How do you keep waffle cones crispy?
This one’s super important! Let them cool on a wire rack, then store them in an airtight container. Moisture is the enemy of crunch, so keep them dry!
5. Can I use a different sweetener?
Honestly, we tried. But when we didn’t use Lakanto Golden, the cones shrank or didn’t get crispy. So we really recommend sticking with the exact sweeteners listed in the recipe.
6. What if I don’t have a waffle cone maker?
We tried using a pan once, but it didn’t come out the same. A real waffle cone maker helps you get that thin, even crisp. It’s definitely worth having if you plan to make these often!
7. Can I make these cones into bowls instead?
Yes! We do it all the time. Just press the warm waffle into a bowl mold or over an upside-down bowl. Let it cool and harden. Boom-waffle bowl!
8. Why did my cone break when I rolled it?
You have to roll them fast, right after taking them off the waffle iron. If you wait even 30 seconds, they’ll stiffen up and crack. We’ve made that mistake before-more than once!
9. How many cones does this recipe make?
We always get about 8 cones when we use 1/8 cup batter for each one. Sometimes we sneak a little more in and end up with 7 thicker ones.
10. Can I freeze the waffle cones?
We tried it, but they lost their crunch. It’s better to keep them in a dry spot at room temp and eat them within 5 days. They’re so good-they usually don’t last that long anyway!
This keto-friendly Baskin Robbins Waffle Cone recipe is proof that indulgence doesn’t need to mean compromise. Whether you’re scooping homemade keto vanilla or your favorite low-carb pint, this cone will hold up and impress.
Pro Tip: Stick with Lakanto Golden for crisp, sturdy cones that don’t shrink-and feel free to mix in sesame seeds or flavor extracts to customize your cones.
Feel free to share your experience with this recipe by trying it out. Don’t forget to drop a comment and provide your feedback on the blog for us to read.
Additionally, You can also like and, follow us on Pinterest, and Reddit for more updates. Your thoughts and engagement are greatly appreciated!